Most stuck desks recover with (1) power/cable checks, (2) a proper hard reset at the lowest position, and (3) replacing the failed leg-motor or control box, followed by a re-sync. Use the decision path below to confirm which part failed before ordering anything.
1) Fast Triage (2–5 min)
Power path
- Plug directly into a wall outlet (avoid chained strips). Check the PSU brick LED (if present).
- Reseat the DC jack at the control box and the handset plug until they “click.”
Cabling
- Inspect leg-motor leads at the control box for bent pins or crushed insulation; secure slack so it can’t snag while lifting.
If the handset stays dark, suspect PSU/control box. If it lights but won’t travel, move to reset.
2) Hard Reset / Re-Sync (fixes many stalls)
Typical procedure
- Lower to the absolute bottom (or keep holding Down).
- Hold Down for ~10–20 s until you hear a relay click or see a small jog.
- Release and test Up/Down.
- If you see RST/ASR/E-codes, repeat the hold-Down step at the bottom.
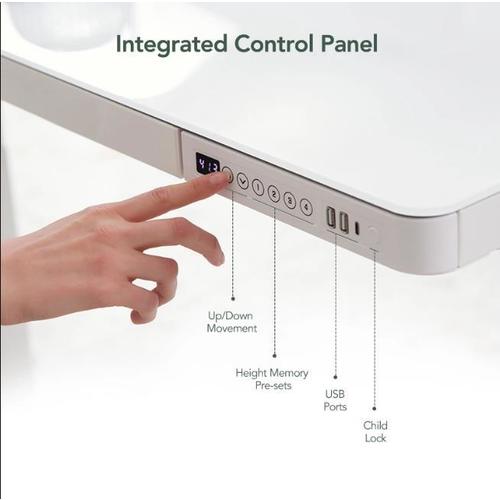
Some handsets display “bot” at the low end, “top” at the high end, feature child lock (“Loc”), and allow anti-collision sensitivity changes (A-0 off, A-1/A-2/A-3 increasing). Error notes such as E01/E02 may require waiting before retry.
3) Identify the Fault — Motor vs Control Box (10 min)
Use a port-swap test:
- Label left/right leg leads L/R at the control box.
- Swap them (L→R port, R→L port).
- Test the desk:
- If the problem moves to the other side, the leg-motor you moved is bad.
- If the same side still fails, the control-box port (or the box itself) is bad.
4) Tools & Prep (what to stage before you wrench)
Tools: Phillips screwdriver, metric hex keys (often 4/5/6 mm), small socket set (often 10/12/13 mm), Velcro ties, painter’s tape/labels, flashlight.
Prep & safety: Unplug AC. Support the top so it can’t tip when a leg is removed. Photograph cable routing/ports before disconnecting. Keep fingers clear of telescoping columns.
5) Replace a Failed Motorized Leg (30–60 min)
Proceed only if the swap test pointed to a leg-motor.
- Power off and protect the surface (blankets/foam).
- Clear access (remove CPU holder/drawer if blocking bolts).
- Disconnect the leg’s motor lead at the control box; unclip retainers (don’t pull by the wire).
- Unbolt the leg from rails/cross-member (keep washers/spacers in order).
- Slide out the leg; check for bent inner tubes or galling (mechanical jam signs).
- Install the new leg in the same orientation; hand-tighten first, then snug (follow frame torque if specified).
- Reconnect to the correct port (match your labels/photos).
- Cable-manage slack so nothing rubs on columns or cross-bars.
- Power up and re-sync (next section).
6) Control Box Replacement (when the fault doesn’t move)
- Unplug AC; photograph all ports (M1/M2, handset, PSU).
- Swap in the new control box; seat each plug until it clicks.
- Perform a reset/re-sync at the bottom and run full-range tests.
7) Re-Sync After Any Repair
- Drive to absolute bottom.
- Hold Down for 10–20 s until you hear/see the reset cue.
- Travel to top and back down to confirm smooth, even motion.
- Re-set height presets (e.g., sit 72 cm, stand 110 cm).
Some handsets will show “bot/top” during calibration and permit child lock and anti-collision sensitivity adjustments afterward.
8) Symptom → Likely Cause
- No lights, no motion → outlet/PSU/control-box power path.
- Beeps/twitch then stops → current limit from jammed leg or failing motor.
- Moves down only → controller in reset/error; re-sync required.
- Uneven/racking → one motor not driving; failed leg or desync.
- E-codes (e.g., E01/E02) → wait interval; recheck connections; reset again.
9) Practical Tips to Avoid Repeat Failures
- Respect load & span: Over-wide/heavy desktops increase stress.
- Keep cables floating: Use clamps/ties so leads don’t chafe telescoping tubes.
- Level feet & seasonal check: Tighten hardware, ensure glides sit flush.
- Use presets: One-touch moves reduce partial-stall heat and mis-sync.
10) Quick Decision Tree
No power → verify outlet/brick → reseat DC & handset → reset.
Still stuck → swap leg ports at control box.
Fault moved → replace leg-motor → re-sync.
Fault stayed → replace control box → re-sync.
Jerky/uneven → inspect leg tubes; replace damaged leg → re-sync.
Image Placement Map
- Figure 1: Control box & port labels (M1/M2, handset, DC) — place in Section 1 or 3.
- Figure 2: Handset UI (“bot/top”, lock “Loc”, sensitivity “A-0/1/2/3”, memory 1–4) — place in Sections 2 & 7.
- Figure 3: Component/fastener overview (lifting columns, feet, cable clamps) — place in Sections 4 & 5.
TL;DR
Fix order: Power → Reset at bottom → Swap leg ports → Replace motor or control box → Re-sync.
Most common win: Correct hard reset + new leg-motor on the side that fails after the swap test.
Keep it fixed: Cable-manage, stay within load/span, and re-sync after any change.
Notes: Model visuals and handset terminology (e.g., “bot/top,” “Loc,” A-levels, E-codes), accessory lists, and safety cautions above are aligned to the supplied manuals for typical dual-motor frames and handsets. Cab-PC-08304 (Cab-PC-08305)-ET116G, ET118W-N_EN-210402


